[h=2]Windows 10 has deep cloud hooks and shares a lot of data with Microsoft in order to create a smart, seamless experience across devices. If you lean more towards privacy, here's how to disable all of it.[/h]
There’s no doubt about it: Windows 10 is veritably infused with data-tracking tidbits and hooks into all sorts of Microsoft’s online services? Handing over all that data has some tangible benefits, like Windows 10’s OneDrive integration and the Bing-powered brains behind the Cortana digital assistant, but not everyone is thrilled with the idea of Big Brother Bill Gates constantly looking over their digital shoulder.
Don’t fret. I’m here to show you how to get your PC and its data out of the cloud and back on silicona firma. (Yes, I did just make that up.)
This guide will show you how to disable Windows 10’s integration, as well as provide tips on what those features actually do. That way you can decide whether you want to keep any of it active or just shut the door on Microsoft’s cloud altogether.
[h=2]Advertising[/h]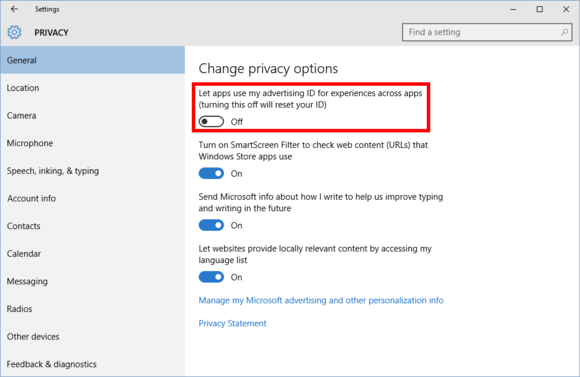 One setting you should consider disabling is all the advertising integration in Windows 10. Some of this was also present in Windows 8, but if you’re just learning about it now you might as well turn it off.
Personally, I don’t mind seeing ads on websites since that’s what pays for most of the free content we see online—including this site. What I do mind is “ad personalization.” I don’t need ads that are supposedly tailored to my personal tastes thanks to little cookie spies that follow my travels around the web. Generic ads targeted at a site or app’s most likely demographic are just fine by me, thanks.
Turning off personalized ads in Windows 10 is a two-step process. First, go to Settings > Privacy > General and slide the option that says “Let apps use my advertising ID for experience across apps (turning this off will reset your ID)” to Off. (We’ll come back to the Settings app later to deal with the rest of those privacy settings.)
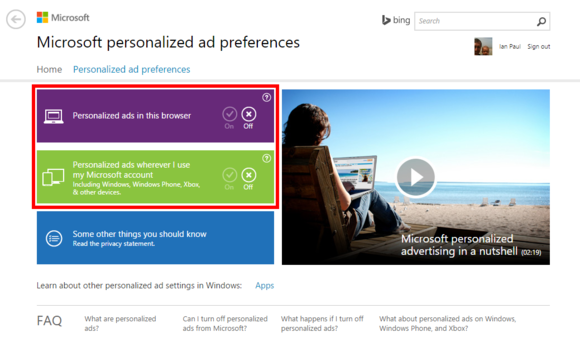 Next, open your web browser of choice and go to choice.microsoft.com/en-us/opt-out. There, select Off for “Personalized ads wherever I use my Microsoft account” and “Personalized ads in this browser.”
 But if you’re just not into Cortana, turning it off is very simple. And if you’ve never used Cortana then don’t worry about it! It’s already off.
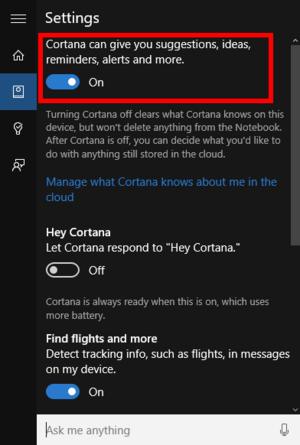
For everyone else, click on the Cortana icon in the taskbar, and then click on the notebook icon on the left-hand side of the pop-up panel. Select Settings from the list of options that appear.
Now, just slide the top option that says “Cortana can give you suggestions, ideas, reminders, alerts, and more” to Off.
Once Cortana is gone, you’ll see a new option that says “Search online and include web results.” As its title suggests, this includes Bing results when you search for things on your PC. You’ll have to decide whether you want that enabled or not.
At this time, it’s also a good idea to jump back into the Settings app’s privacy section. Open Settings and go to Privacy > Speech, inking, and typing. This is a setting that allows Cortana to gather all kinds of data about you to properly deliver its services. Click the Stop getting to know me button to end that. Note that this will delete collected data stored on your PC, and also turns off dictation functionality.
Once that’s done, click on “Go to Bing and manage personal info for all your devices.” This is where you can scrub any data that Microsoft has collected about you from the company’s servers. Clearing this data will affect the performance of Cortana and other personalization services across your devices and Microsoft services. You can read through this page to understand what you’re losing, or just jump to the bottom and click Clear.
[h=2]Wi-Fi Sense and peer-to-peer[/h] Now let’s handle two features of Windows 10 that are innovative, but privacy types may not appreciate.
The first is Wi-Fi Sense. This is turned on by default, but doesn’t do anything unless you explicitly use it. Wi-Fi Sense allows you to share access to password-protected Wi-Fi routers. The passwords are shared silently in the background over encrypted connections. People you share network access with never see the actual passwords, and they are not in turn granted sharing permissions for their friends.
The idea is that if your friends or family come over to your house they don’t have to ask for your password. Instead, anyone with a Windows 10 device and is a digital friend of yours is automatically logged in. This is arguably more secure than sharing your password with anyone who walks through your door. Once a person knows your Wi-Fi password they can easily share it with others, after all.
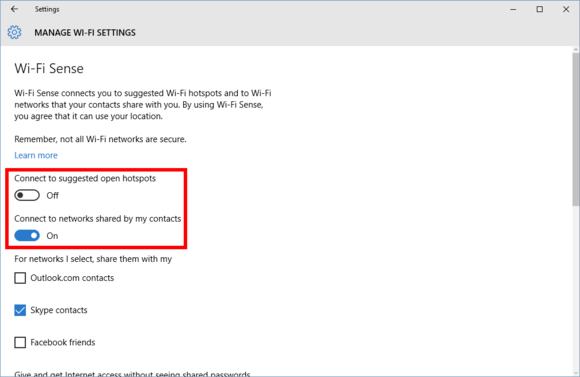 To make sure Wi-Fi Sense is off and stays off, go to Settings > Network & Internet > Wi-Fi > Manage Wi-Fi Settings. Then slide the two options that say “Connect to suggested open hotspots” and “Connect to open networks shared by my contacts” to Off.
Moving on, Windows 10 shares system files and updates downloaded to your PC with others by default. This peer-to-peer networking feature turns you into what you might call an unwitting good Windows citizen by helping others get updates and system files faster. In return, your PC also receives update bits via other people’s PCs. It’s like using a BitTorrent client, essentially.
If you don’t like the sound of that, go to Settings > Update & Security > Windows Update > Advanced options > Choose how updates are delivered. By default, “Updates from more than one place” is enabled and set to both local sources and other PCs on the Internet. You have two additional choices, however: You can distribute updates only to PCs on your local network, or shut off the P2P updates entirely and stick to using Microsoft’s servers alone.
If you want to shut everything off, just turn the slider on this screen to Off. If you want to share with PCs on your local network then leave the slider in the On position and select the radio button that says “PCs on my local network.” For more detailed instructions check out our primer on stopping P2P Windows 10 updates.
[h=2]OneDrive[/h]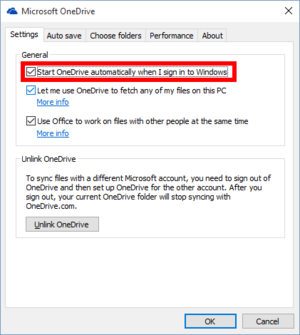 If you’re not interested in storing your files on Microsoft’s cloud servers, you can turn off OneDrive so it stops bugging you to configure it.
Just click the upward facing arrow in the system tray on the right-hand side of the taskbar. Then right-click the OneDrive icon and select Settings.
In the new window that opens, uncheck “Start OneDrive automatically when I sign in to Windows.” You can also uncheck the other two boxes if they’re selected as well.
[h=2]Back to Settings[/h] Woo! Let’s take a breather. Feeling good? We’ve got the most essential parts of our privacy lockdown finished. Ready for some more? It’s time to dive into all those other privacy options in the Settings app by going to Settings > Privacy.
This is really the core of Windows 10’s privacy controls, but most are not as critical as the other items we’ve covered. The exception would be the remaining items under Privacy > General. Here you’ll want to turn off “Send Microsoft info about how I write to help us improve typing and writing in the future.” You may also want to shut off “Let websites provide locally relevant content by accessing my language list.”
In an upcoming section we’ll talk about SmartScreen Filter and whether you want to turn that off.
After taking care of the settings under General, what you’ll mostly see in the remaining sections are methods for apps to access your data.
Each panel is pretty self-explanatory.
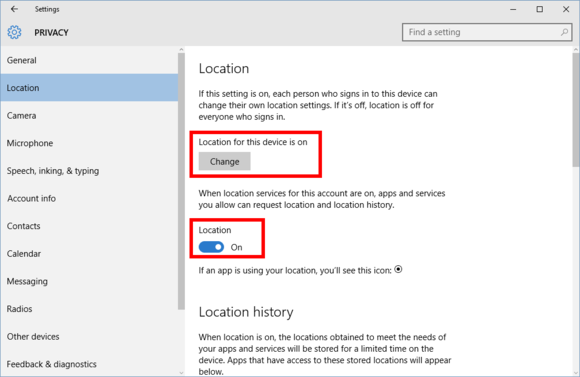 The Location section lets you control whether apps can use your location to deliver services like weather forecasts and local news. Location is a little unusual since it can be set both on a per-device or per-user basis. To turn off location for the whole PC, click the Change button. To turn it off for only the logged-in user, turn the “Location” slider to Off.
You can also control location settings on a per-app basis by scrolling down to “Choose apps that can use your location.”
After location is taken care of, the rest of the settings follow a similar format, allowing you to turn off access to things like your camera, microphone, contacts, and calendar on a system-wide or per-app basis. Keep in mind there may be some things you want to keep on. The Mail app isn’t much use if it can’t access your contacts, for example.
[h=2]Microsoft Edge[/h] Even if you use Microsoft’s fancy new browser, there might be features—like Cortana integration and typing prediction—that you may want to disable if you don’t want to send any data back to Microsoft.
Open Edge and click on the menu icon in the far right corner (three horizontal dots) and then go to Settings > View Advanced Settings. Here you have the option to turn off Adobe Flash—stop those Flash cookies!—and then under “Privacy and services” you can decide to switch off a number of settings.
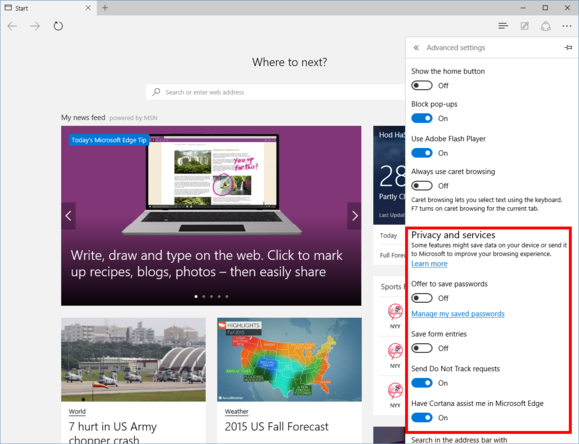 Microsoft Edge’s Advanced options.
[h=2]Control Panel SmartScreen[/h] There are three—count ‘em, three—SmartScreen filters in Windows 10. The second one is in the Control Panel and stops you from installing potentially malicious desktop programs on your PC. It first appeared in Windows 8.
To offer this security feature, however, you have to share with Microsoft information about the programs you download and install in anonymized form.
Advanced users may want to just disable this feature as it tends to be a nuisance. I’d strongly advise novice and intermediate users to leave SmartScreen as is, however.
 To disable it, right-click the Start menu button and select Control Panel from the context menu. Then, with the category view enabled, navigate to System and Security > Security and Maintenance. Select Change Windows SmartScreen settings from the left-side pane.
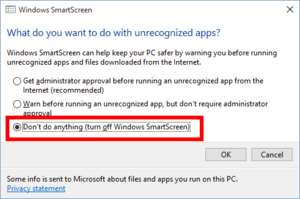
In the window that opens, select the radio button next to Don’t do anything (turn off Windows SmartScreen).
[h=2]Windows 10 and the web[/h] Nope, we’re still not done. Two more sections to go—although the last one is only for the hardcore privacy types. First we want to deal with some odds and ends.
Let’s start by examining the way Windows 10 syncs your personalized settings across devices, including your desktop background, web browser settings, saved passwords, language preferences, ease of access, and so-called “other Windows settings.”
The ability to sit down with any Windows 10 device, log in with your Microsoft account, and have all your settings and preferences immediately show up is powerfully handy indeed. But if you’d rather not store all that information in Microsoft’s servers, the easiest thing to do here is just turn the “Sync settings” option found under Settings > Accounts > Sync your settings to Off. If you want to take a more fine-grain approach then you can drill down into the synced items under “Individual sync settings.”
Finally, let’s move on to the SmartScreen Filter. No, not the Edge one. Nope, not the one for downloading apps either. This is the Windows Store version we saw previously under Settings > Privacy > General.
Like its Edge counterpart, SmartScreen Filter checks the URLs of Windows Store apps and makes sure they’re not up to anything fishy. It’s a security measure that I’d argue is worth turning on. But if you’d rather not use it, go to Settings > Privacy > General and slide the option that says “Turn on SmartScreen Filter to check web content (URLs) that Windows Store apps use” to Off.
[h=2]Local account[/h]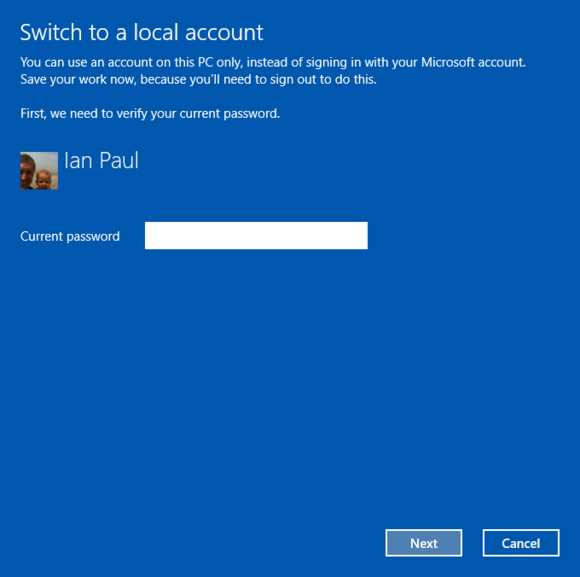 Finally, we’ve come to the last step: using Windows 10 with a local account. This is basically like putting a Windows 7 user account on your PC with few ties to the cloud.
Navigate to Settings > Accounts > Your account and then select “Sign in with a local account instead.” Then just follow the wizard to start using a local account on your PC—one that isn’t tied to your Microsoft account.
Using a local account will still let you access some built-in features in Windows 10, such as the Mail app, but you may also lose access to others that require a Microsoft account, such as the Windows Store. You also can’t sync your settings to other Windows devices, but if privacy is your focus you probably turned that off in the previous step anyway.
So there you have it: All the privacy steps you need to take to keep Windows 10 firmly planted on the desktop and not the cloud. It’s admittedly a lot of work, but the good news is it only takes a few minutes to stay local once you know what you need to do.
[h=2]But wait, there may be more?[/h] This guide is only meant to turn off the user-facing cloud-connected facets of Windows 10. When this piece was being readied for publication, Ars Techica’s Peter Bright reported that there appears to be more “phoning home” going on behind the scenes with Windows 10—even with all the previous privacy steps are completed.
For those who want to dig into the nuts and bolts of Windows 10 and its connection to Microsoft servers, we recommend you turn to Ars Technica’s report after you’ve taken the steps outlined here. Without taking these privacy measures first, dealing with what’s left won’t do much good.
There’s no doubt about it: Windows 10 is veritably infused with data-tracking tidbits and hooks into all sorts of Microsoft’s online services? Handing over all that data has some tangible benefits, like Windows 10’s OneDrive integration and the Bing-powered brains behind the Cortana digital assistant, but not everyone is thrilled with the idea of Big Brother Bill Gates constantly looking over their digital shoulder.
Don’t fret. I’m here to show you how to get your PC and its data out of the cloud and back on silicona firma. (Yes, I did just make that up.)
This guide will show you how to disable Windows 10’s integration, as well as provide tips on what those features actually do. That way you can decide whether you want to keep any of it active or just shut the door on Microsoft’s cloud altogether.
[h=2]Advertising[/h]
 One setting you should consider disabling is all the advertising integration in Windows 10. Some of this was also present in Windows 8, but if you’re just learning about it now you might as well turn it off.
Personally, I don’t mind seeing ads on websites since that’s what pays for most of the free content we see online—including this site. What I do mind is “ad personalization.” I don’t need ads that are supposedly tailored to my personal tastes thanks to little cookie spies that follow my travels around the web. Generic ads targeted at a site or app’s most likely demographic are just fine by me, thanks.
Turning off personalized ads in Windows 10 is a two-step process. First, go to Settings > Privacy > General and slide the option that says “Let apps use my advertising ID for experience across apps (turning this off will reset your ID)” to Off. (We’ll come back to the Settings app later to deal with the rest of those privacy settings.)
 Next, open your web browser of choice and go to choice.microsoft.com/en-us/opt-out. There, select Off for “Personalized ads wherever I use my Microsoft account” and “Personalized ads in this browser.”
Tip: If you are using an ad blocker or an extension like the EFF’s Privacy Badger, you may have to turn it off for this site before you’ll see the option to turn off in-browser ad personalization. The site apparently has to set a cookie for this second option to work.
[h=2]Cortana[/h] Microsoft’s built-in digital assistant is incredibly useful for quickly setting reminders, calendar events, and sending email, among many other things. The information it collects is very similar to what Google does with Google Now, which you may already be using on your Android device.
 But if you’re just not into Cortana, turning it off is very simple. And if you’ve never used Cortana then don’t worry about it! It’s already off.
For everyone else, click on the Cortana icon in the taskbar, and then click on the notebook icon on the left-hand side of the pop-up panel. Select Settings from the list of options that appear.
Now, just slide the top option that says “Cortana can give you suggestions, ideas, reminders, alerts, and more” to Off.
Once Cortana is gone, you’ll see a new option that says “Search online and include web results.” As its title suggests, this includes Bing results when you search for things on your PC. You’ll have to decide whether you want that enabled or not.
At this time, it’s also a good idea to jump back into the Settings app’s privacy section. Open Settings and go to Privacy > Speech, inking, and typing. This is a setting that allows Cortana to gather all kinds of data about you to properly deliver its services. Click the Stop getting to know me button to end that. Note that this will delete collected data stored on your PC, and also turns off dictation functionality.
Once that’s done, click on “Go to Bing and manage personal info for all your devices.” This is where you can scrub any data that Microsoft has collected about you from the company’s servers. Clearing this data will affect the performance of Cortana and other personalization services across your devices and Microsoft services. You can read through this page to understand what you’re losing, or just jump to the bottom and click Clear.
[h=2]Wi-Fi Sense and peer-to-peer[/h] Now let’s handle two features of Windows 10 that are innovative, but privacy types may not appreciate.
The first is Wi-Fi Sense. This is turned on by default, but doesn’t do anything unless you explicitly use it. Wi-Fi Sense allows you to share access to password-protected Wi-Fi routers. The passwords are shared silently in the background over encrypted connections. People you share network access with never see the actual passwords, and they are not in turn granted sharing permissions for their friends.
The idea is that if your friends or family come over to your house they don’t have to ask for your password. Instead, anyone with a Windows 10 device and is a digital friend of yours is automatically logged in. This is arguably more secure than sharing your password with anyone who walks through your door. Once a person knows your Wi-Fi password they can easily share it with others, after all.
 To make sure Wi-Fi Sense is off and stays off, go to Settings > Network & Internet > Wi-Fi > Manage Wi-Fi Settings. Then slide the two options that say “Connect to suggested open hotspots” and “Connect to open networks shared by my contacts” to Off.
Moving on, Windows 10 shares system files and updates downloaded to your PC with others by default. This peer-to-peer networking feature turns you into what you might call an unwitting good Windows citizen by helping others get updates and system files faster. In return, your PC also receives update bits via other people’s PCs. It’s like using a BitTorrent client, essentially.
If you don’t like the sound of that, go to Settings > Update & Security > Windows Update > Advanced options > Choose how updates are delivered. By default, “Updates from more than one place” is enabled and set to both local sources and other PCs on the Internet. You have two additional choices, however: You can distribute updates only to PCs on your local network, or shut off the P2P updates entirely and stick to using Microsoft’s servers alone.
If you want to shut everything off, just turn the slider on this screen to Off. If you want to share with PCs on your local network then leave the slider in the On position and select the radio button that says “PCs on my local network.” For more detailed instructions check out our primer on stopping P2P Windows 10 updates.
[h=2]OneDrive[/h]
 If you’re not interested in storing your files on Microsoft’s cloud servers, you can turn off OneDrive so it stops bugging you to configure it.
 Just click the upward facing arrow in the system tray on the right-hand side of the taskbar. Then right-click the OneDrive icon and select Settings.
In the new window that opens, uncheck “Start OneDrive automatically when I sign in to Windows.” You can also uncheck the other two boxes if they’re selected as well.
[h=2]Back to Settings[/h] Woo! Let’s take a breather. Feeling good? We’ve got the most essential parts of our privacy lockdown finished. Ready for some more? It’s time to dive into all those other privacy options in the Settings app by going to Settings > Privacy.
This is really the core of Windows 10’s privacy controls, but most are not as critical as the other items we’ve covered. The exception would be the remaining items under Privacy > General. Here you’ll want to turn off “Send Microsoft info about how I write to help us improve typing and writing in the future.” You may also want to shut off “Let websites provide locally relevant content by accessing my language list.”
In an upcoming section we’ll talk about SmartScreen Filter and whether you want to turn that off.
After taking care of the settings under General, what you’ll mostly see in the remaining sections are methods for apps to access your data.
Each panel is pretty self-explanatory.
 The Location section lets you control whether apps can use your location to deliver services like weather forecasts and local news. Location is a little unusual since it can be set both on a per-device or per-user basis. To turn off location for the whole PC, click the Change button. To turn it off for only the logged-in user, turn the “Location” slider to Off.
You can also control location settings on a per-app basis by scrolling down to “Choose apps that can use your location.”
After location is taken care of, the rest of the settings follow a similar format, allowing you to turn off access to things like your camera, microphone, contacts, and calendar on a system-wide or per-app basis. Keep in mind there may be some things you want to keep on. The Mail app isn’t much use if it can’t access your contacts, for example.
[h=2]Microsoft Edge[/h] Even if you use Microsoft’s fancy new browser, there might be features—like Cortana integration and typing prediction—that you may want to disable if you don’t want to send any data back to Microsoft.
Open Edge and click on the menu icon in the far right corner (three horizontal dots) and then go to Settings > View Advanced Settings. Here you have the option to turn off Adobe Flash—stop those Flash cookies!—and then under “Privacy and services” you can decide to switch off a number of settings.
 Microsoft Edge’s Advanced options.
- “Offer to save passwords” and “Save form entries” are both on by default, which you may not want. They are handy features though. Your call!
- “Have Cortana assist me in Microsoft Edge” lets Cortana work inside the browser. If you’ve already switched off Cortana, you definitely don’t want this feature on.
- “Show search suggestions as I type” uses Microsoft’s web-powered prediction service to try and figure out what you’re searching for and then fill it in automatically. Chrome and the standard version of Google search offer something similar so you may already appreciate this convenience elsewhere and not realize it.
- “Use page prediction to speed up browsing, improve reading, and make my overall experience better” is similar search suggestions in that it sends your browsing history to Microsoft. The company says this feature “uses aggregated browsing history data to predict which pages you’re likely to browse to next, and then loads those pages in the background for a faster browsing experience.” If you don’t like the sound of that, you should turn it off.
- “Help protect me from malicious sites and downloads with SmartScreen filter” lets Microsoft block malicious sites and downloads from infecting your PC. This feature lets Microsoft download a list of bad-acting URLs to your PC and then Edge can block those sites. However, with SmartScreen active, whenever you land on a malicious URL you will be redirected to a Microsoft webpage that will get some PC information and the URL of the page you visited. If you ask me, the SmartScreen filter is pretty benign and well worth keeping activated.
[h=2]Control Panel SmartScreen[/h]
 There are three—count ‘em, three—SmartScreen filters in Windows 10. The second one is in the Control Panel and stops you from installing potentially malicious desktop programs on your PC. It first appeared in Windows 8.
To offer this security feature, however, you have to share with Microsoft information about the programs you download and install in anonymized form.
Advanced users may want to just disable this feature as it tends to be a nuisance. I’d strongly advise novice and intermediate users to leave SmartScreen as is, however.
 To disable it, right-click the Start menu button and select Control Panel from the context menu. Then, with the category view enabled, navigate to System and Security > Security and Maintenance. Select Change Windows SmartScreen settings from the left-side pane.
In the window that opens, select the radio button next to Don’t do anything (turn off Windows SmartScreen).
[h=2]Windows 10 and the web[/h] Nope, we’re still not done. Two more sections to go—although the last one is only for the hardcore privacy types. First we want to deal with some odds and ends.
Let’s start by examining the way Windows 10 syncs your personalized settings across devices, including your desktop background, web browser settings, saved passwords, language preferences, ease of access, and so-called “other Windows settings.”
The ability to sit down with any Windows 10 device, log in with your Microsoft account, and have all your settings and preferences immediately show up is powerfully handy indeed. But if you’d rather not store all that information in Microsoft’s servers, the easiest thing to do here is just turn the “Sync settings” option found under Settings > Accounts > Sync your settings to Off. If you want to take a more fine-grain approach then you can drill down into the synced items under “Individual sync settings.”
Finally, let’s move on to the SmartScreen Filter. No, not the Edge one. Nope, not the one for downloading apps either. This is the Windows Store version we saw previously under Settings > Privacy > General.
Like its Edge counterpart, SmartScreen Filter checks the URLs of Windows Store apps and makes sure they’re not up to anything fishy. It’s a security measure that I’d argue is worth turning on. But if you’d rather not use it, go to Settings > Privacy > General and slide the option that says “Turn on SmartScreen Filter to check web content (URLs) that Windows Store apps use” to Off.
[h=2]Local account[/h]
 Finally, we’ve come to the last step: using Windows 10 with a local account. This is basically like putting a Windows 7 user account on your PC with few ties to the cloud.
Navigate to Settings > Accounts > Your account and then select “Sign in with a local account instead.” Then just follow the wizard to start using a local account on your PC—one that isn’t tied to your Microsoft account.
Using a local account will still let you access some built-in features in Windows 10, such as the Mail app, but you may also lose access to others that require a Microsoft account, such as the Windows Store. You also can’t sync your settings to other Windows devices, but if privacy is your focus you probably turned that off in the previous step anyway.
So there you have it: All the privacy steps you need to take to keep Windows 10 firmly planted on the desktop and not the cloud. It’s admittedly a lot of work, but the good news is it only takes a few minutes to stay local once you know what you need to do.
[h=2]But wait, there may be more?[/h] This guide is only meant to turn off the user-facing cloud-connected facets of Windows 10. When this piece was being readied for publication, Ars Techica’s Peter Bright reported that there appears to be more “phoning home” going on behind the scenes with Windows 10—even with all the previous privacy steps are completed.
For those who want to dig into the nuts and bolts of Windows 10 and its connection to Microsoft servers, we recommend you turn to Ars Technica’s report after you’ve taken the steps outlined here. Without taking these privacy measures first, dealing with what’s left won’t do much good.